As the standing desk trend becomes more and more popular all around the world, a lot of people are starting to ask themselves whether or not they should switch to one and whether this is the future in office decor or just a fad. Given the benefits presented by this design direction, it would be safe to assume that standing desks won’t be forgotten any time soon, especially those with adjustable height and the option of sitting down when desired. It’s definitely worth trying one out, whether it’s a diy standing desk, a designer-made one or an Ikea desk.
Standing Desk 02 by Artifox is the second version of an already great design. The desk has been perfected to be even more minimalist and good-looking than the previous model. You can choose it for your workplace or for your home office and you can take advantage of its simple and practical design to maintain a stylish and clutter-free decor. There’s a built-in dock for your smart devices, hanging hooks for earphones and a grid that lets you manage your cables in style.
Movi Standing Desk
Standing all day is not exactly any better that being seated the whole time and that’s why desks like Movi are considered great. This is a desk that lets the user easily switch from a seated to a standing position, to alternate throughout the day depending on the type of task or simply on the mood. The height of the desk changes with the simple push of a button and a quiet electric motor does all the work in seconds.
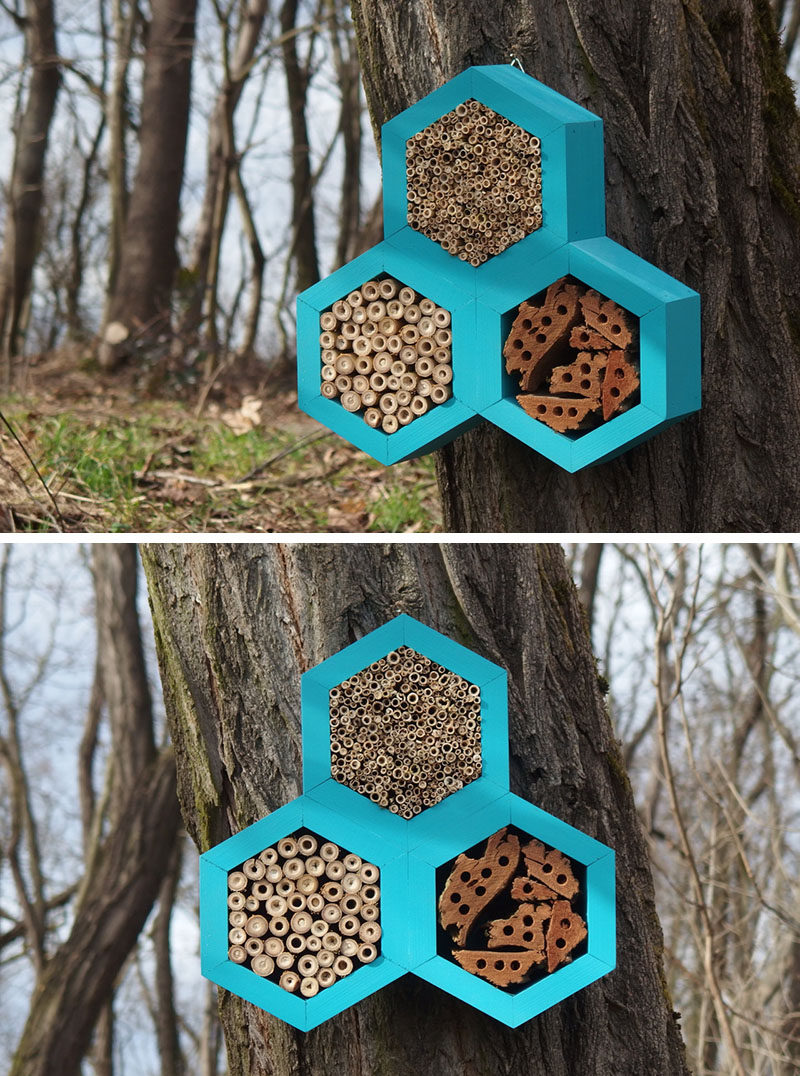
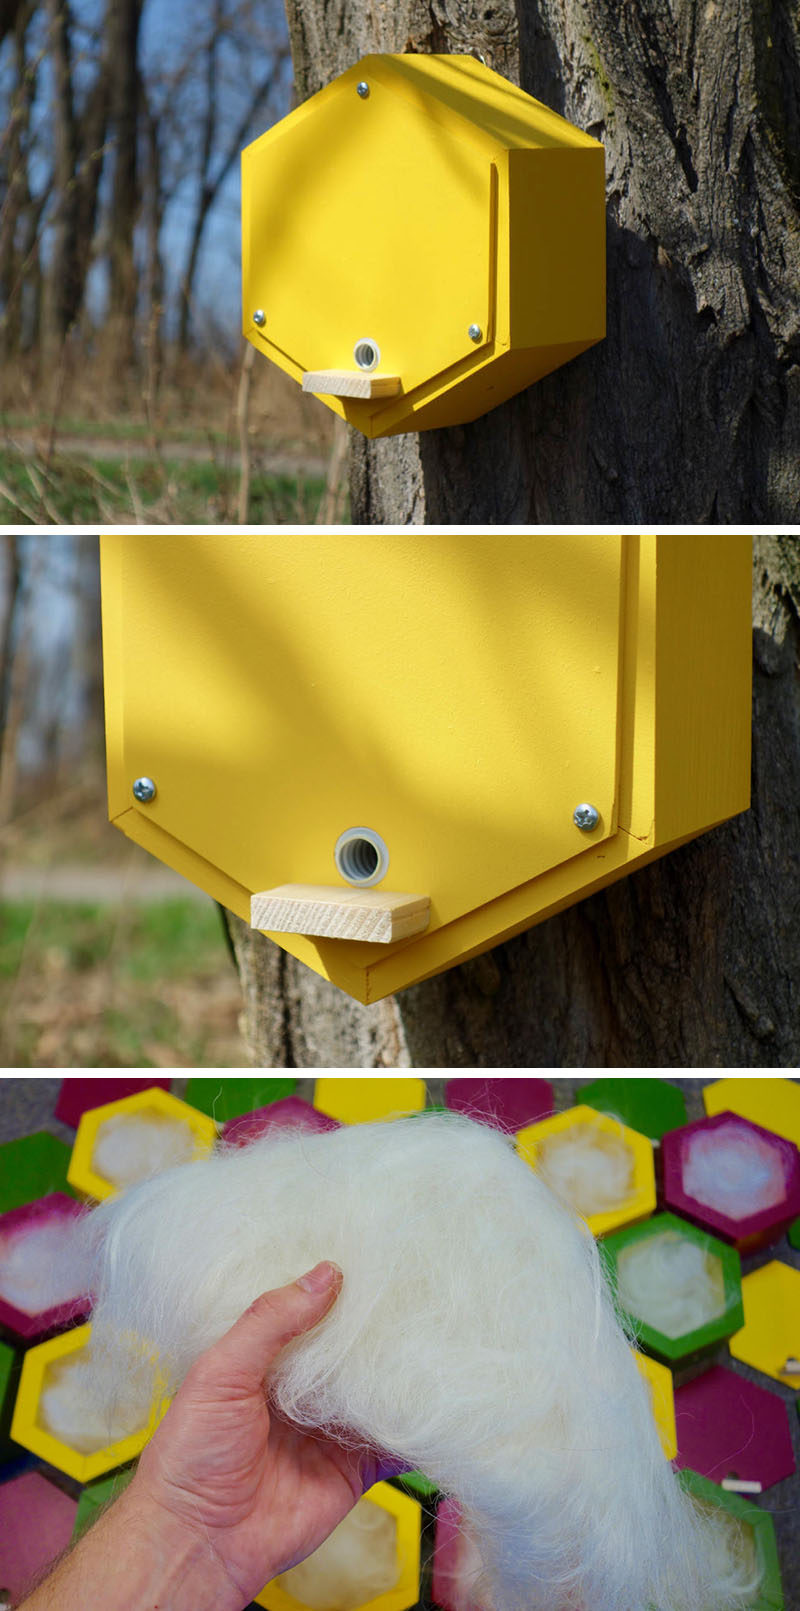
Designer Boleslav Daska ofDILNA HAMMER, creates a variety of little bee, butterfly and insect friendly hotels for gardens.
The Bee Hotel takes on a hexagonal shape similar to the shape of a honeycomb and creates many hiding places for non-aggressive insects like solitary bees and ladybugs.
The BumbleBee House has been designed specifically forbumblebees as it has a built-in hallway that leads to an interior filled with wool where the bee can create its home.
The Butterfly House has two slots that allows butterflies and moths to enter and find respite out of the elements. Inside, there’s a couple of wood pieces placed at the back of the house that allow them to rest.
The final design is the Beetle Shelter that serves as a refuge for a wide variety of small insects. The shelter is filled withcotton pulp to create a warm interior and it can be used as a starting material for the shelter of its first visitors.
By adding a basement bathroom in your home, you can not only add extra convenience and comfort for your family but can also substantially increase the value of your home.
DON’T MISS:
Step 1:
You need to locate the main drain by breaking through the concrete in order to make sure that the main line is where you think it should be. You will also want to make sure that it is deep enough to allow adequate downhill slope in the new drain lines.
Photo: Spencer on the Go
Step 2:
After you have located the main line, grab a pencil and mark out the whole bathroom on the basement floor to allow ample room for walls, toilet, sink, shower, and the drain lines.
Photo: Spencer on the Go
Step 3:
Using an old sledgehammer, start breaking through your basement floor to bust out your trench line for your Y-fitting. Shut off the water and locate your tie-in point, preferably near an existing hub.
Photo: Spencer on the Go
Step 4:
Using rubber coupler, slip them onto the main line, slide the couplers over the joints, and tighten the bands. Next, plug the inlet and now you can turn the water back on.
Photo: Zillow
Step 5:
Build your drain system by determining exactly where your shower and sink drain will be after you have framed your walls. Have the building inspector improve before continuing your work.
So why should home interior design be important to you? Well, think about what it’s like to live in a badly designed home. Every day you get up, and maybe the position of your bed annoys you. You have to walk through a little obstacle course to get to your ugly kitchen, where things are stacked up because there isn’t enough storage space. Then you go to your badly-painted bathroom to brush your teeth. Sounds bad, doesn’t it? Or even worse – perhaps it sounds familiar?
The average person spends at least half their life in their home – it is a more familiar environment to you than almost any other. In this situation, any little annoyances that you might have will be magnified a thousand times over until they start driving you up the wall. What you want is for your home to be perfect, and as long as you have the time and the money, it’s well worth going to some trouble and expense to get it just right.
If you want to be happy, then the design of your home should be just as important to you as your job or your family. It’s about putting your personal stamp on your home and making it your own. And you can’t just do it once and leave it either – change is healthy, and helps to keep your life feeling fresh. When you have visitors over, you can be really proud of your home, and feel like it reflects who you are.
Apart from anything else, good home interior design can add a surprising amount of value to your home for very little cost. Improving the design of your home doesn’t have to be expensive, and even if you do spend quite a lot, it’ll certainly be cheaper than moving house.
At Homestuff123.com, we aim to bring you fresh new ideas in home design which will hopefully give you some inspiration to bring out the best in your home. And don’t forget to visit our store where we are partnered with Amazon and others to bring you the best in home decor and other products for your home.
Love the natural look, but crave the fine, polished aesthetic of an inner-city apartment? My, have we got an interior for you. This dark and dreamy interior combines rough rocks with polished wood, black slats and high-sheen acrylic, as designed by One Work and photographed by Hey!Cheese Photography. Watch TV against a rock face, looking out to city views. Show guests to a dining table through black slats, lit by state-of-the-art idea lamps. Make your office LED-lit, wooden-slatted and marble-topped. Take a style trip to a darker vision, with our latest modern apartment tour where wood, stone and black reign king.
Using wooden panels above, stone tiles below and roughshod rocks to the side, our first view of the lounge is eclectic. Cold tones in a grey suede six-seater, shagpile rug and textured wallpaper mix with a warmer wooden ceiling, under-rafter LEDs and small bursts of coloured cushions. Looking past the cabinetry’s black acrylic, the scene separates into grey and white with a city view, or darker and more mysterious in the office beckoning beyond.
Making a half-turn, we find the lounge’s focal piece: the roughshod brick wall. Tying into the black theme with a flat-screen TV, its rustic exterior juxtaposes nicely with the living room’s other polished, high-sheen furnishings. A quick bounce off the wall reveals a wide city view, lit like a Christmas tree during day or night.
Step into the corridor, and a puzzle of black and wooden slats awaits. Across grey tiles and polished wooden floors, black push-doors become a slatted feature, opening up the dining room as an artistic wall piece. Framed both horizontally and vertically by gleaming wooden panels, the look piques interest in the rooms surrounding the corridor’s small space. A classic black bookcase with a Japanese, no-borders twist completes the scene, as mirrored-door cabinets beside and beneath increase the space and feeling of sophistication.
When done right, open concept spaces look inviting. Image: Ken Linsteadt Architects
Almost everyone loves an open concept space, where a singular space has multiple uses and why wouldn’t they? Between giving hosts the ability to interact with their guests from the kitchen and allowing parents to easily keep an eye on the kids while they play, this type of layout has managed to become synonymous with modern sleekness and convenience.
However, that’s not to say it doesn’t come with its own set of challenges. After all, without any walls to rely on, the responsibility for defining the space falls entirely on you. To many, knowing how and when to break up the space correctly feels surprisingly daunting.
That’s why we’re here. We’ve uncovered the best tips and tricks for how to effectively design an open concept space. Keep them in mind as you plan out your layout and we’re sure your final product will look like it’s straight out of a magazine or TV show.
Create groupings around different functions. Image: Echelon Interiors
While we recommend having a plan in mind before diving into any design project, it’s crucial when you’re working with an open concept space. Before you can move on to focusing on the room’s aesthetics, you need to have a firm idea of the different ways you intend to use the space.
The best way to do this is to create distinct groupings by function. Whether you need to combine a kitchen, dining area and living space, or something else entirely, you should have an idea of where each grouping will be placed and how big it should be.
When putting the space together, incorporate visual cues to help separate each of your groupings. Consider grounding each one with a distinct throw rug or arranging the furniture into individualized seating areas.
Popularized by the world’s finest hotels, timeless styling, and durable Speakman engineering, the Anystream® Hotel Massage High Pressure Adjustable Shower Head is now a favorite fixture at many hotels and top seller in resorts and homes alike.
Inspired by classic Speakman design elements, The Anystream® Hotel Massage Showerhead impresses with a belled casing and flared lip. 8 center massage jets plus a whole load of 50 powerful full-body sprays.
Adjust the smooth-turn T-handle to switch effortlessly through full coverage and combination spray, gentle rain, and therapeutic, pulsating massage streams.
With the nice weather here, we would all like to get our kids outside more. But, unless you’re lucky enough to live right next door to a park, your kids may be lacking fun things to do outside. We found some of the neatest outdoor toy projects that you can put together today!
1. Pallet Walls
Photo: Pallet Walls
This pallet climbing wall from Woo Home is adorable! Can be made easily using roof angle brackets or a roof truss as a frame. Attach little wood pieces to climb on and canvas for the tent underneath. Consider making an obstacle course by lining several of these in a roll.
2. Spool Table
A perfect solution for outdoor table play, this spool table with bowl cutouts is perfect as a table for eating popsicles, playing in a sandbox, or painting projects. Even if you don’t want to cut the holes in it, a simple sanding and coat of brightly colored paint would turn an old spool into a whimsical children’s table.
Photo: Spool Table
3. Tile Hop-Scotch
How about a game of hop-scotch on these super-simple painted tiles. Buy garden stepping stones from your local garden or hardware store. Use stencils to paint on numbers for a game of hopscotch or maybe a live game of chess. Even if you decide not to paint them, children will be delighted just to hop from stepping stone to stepping stone across the shark-infested waters of your backyard.
Photo: Hop Scotch
4. Tire Climber
This homemade tire climber is pretty awesome. Pick up some old tires from the junkyard (or grandpa’s barn) and then scrub, paint, and bolt together to get this cool climbing structure. Wouldn’t this make a great addition to the pallet wall obstacle course?
Welcome! I’m so glad you are here! Sign up here to have your blog posts delivered right to your inbox to stay in touch.
So this is what our container garden looked like when I first planted the pots. I originally wanted to build beautiful big planter boxes, but instead we opted for planting the tomatoes, peppers, and lettuce this year in the (food safe) in barrels we already had (from here years ago). It was so easy!
And I have to say I am so happy that we just went ahead and planted the garden because we’ve been eating delicious and healthy lettuce and kale for a few weeks now. Soon we’ll have tomatoes and peppers, too!
I took these photos on my cell phone just to text to my mom back when we first planted the pots. The photos were never intended to be shared in a blog post since the plants were so small you can’t even see them!
Yesterday I was thinking about the sweet reader who asked me about the container garden. Was she asking me to put together a Pinterest ready photo spread of my vegetables as soon as they were lush and ready for picking, or was she just curious to see the pots and hear about the garden? I don’t know what she expected, but I know I can sometimes make things more complicated than they need to be :).
So, I told myself that if I can show my mom these photos to give her an idea of what our garden was going to look like this year, I can share them with you all for the same reason.
Even though I hope to share more from our yard this summer, at least now you can visualize it before the summer is over :).
If you don’t have much room in your yard, or you tend to make a project like planting a garden more complicated than you have time for, a container garden can be a simple solution.
Seoul-based design studio mas came about when three product/industrial design graduates from Central Saint Martins and Northumbria University joined forces and their first project is designed for cats. LUNARBOX is a welcome deviation from the standard cat furniture on the market these days you know, the carpeted towers, trees, and houses? Instead, LUNARBOX takes the idea of pet furniture and elevates it for those of us that are particular about interior design.
First, they asked themselves if cat furniture could be a design object that would harmonious work within the home and that led the trio to create LUNARBOX. The design comes about based on the fact that most cats like to feel secure by hanging out in certain spaces. So, they began with the shape of a box and cut out part of one of the corners for the opening. The idea is that the box can be used as a single unit or stacked and arranged into a playground for your cat to climb around on and chill. Strong neodium magnets keep the units connected when you put more than one together.
LUNARBOX is made of birch plywood and comes in three sizes and three different colors.
Kitchens are such versatile rooms. We use them to cook meals for ourselves and our families daily. They hold homework on the island or table. They show off cheese plates and pies when we host parties. They become the hub of the home, all work and life revolving around them. So it’s important that our kitchens are not only efficient but beautiful as well. Nobody wants to wash dishes in a dingy space.
Firstly, you’ll want to choose your base color.The color you paint the walls will greatly influence how your kitchen feels in the end. Once that is decided, you can choose which cabinet orientation gives the best flow and which flooring is the easiest to clean and if you should hang your pots and pans or store them in a cabinet. There are a lot of decisions to make so take some time to scroll through these 100 beautiful kitchens to inspire your own kitchen makeover.You’ll end up with the kitchen you’ve always dreamed of.
White would be considered one of the go to colors for kitchens, but that shouldn’t always be the case. Designer Ann Decker knows that big windows make a white kitchen look bright and fresh, the way that white should look. So make sure you have plenty of natural light in your kitchen to really set off those white walls.
If you can say yes to marble, then say a big enthusiastic yes. McIntosh Moorman Interior Design shows us that marble paired with white can be an incredibly chic kitchen combination. Especially with that tiled marble backsplash.
“I’m proud to be an American!” Share your pride this Fourth of July with colorful and patriotic decorations. We’ll stick with the traditional red, white, and blue, except these items have a vintage flare! These faded tones and old-fashioned fun are sure to make you fall in love!
Old cans, jars, and gift packages can be re-wrapped in red, white, and blue paper as a vintage fourth of July centerpiece! Trust me, it really is as simple as wrapping a gift! Fill with silverware, flags, candles, and more. Can’t find scrapbook or wrapping paper in your taste? Don’t overlook the internet, which has a plethora of options that you can print right from your desk!
vintage fourth of July canister and pinwheels
Goodness, aren’t these just adorable?! Can’t you already imagine little ones blowing these around in the backyard while fireworks sparkle overhead? Instead of making these by yourself, host a little craft party and get those ting hands involved.
Vintage 4th of July pin wheels
Don’t take that bag of old clothes to GoodWill yet…pick out the blue jeans, cut them up into triangles, and have fun painting stars and stripes on them. Use the seam as a ribbon, and your vintage blue jean American bunting is sure to be a hit in your home this summer!
Vintage American flag banner
Burlap offers such a textured, weathered, old-world charm. But the bright red, white, and blue buttons pop with such personality! Design your own little American flag of mismatched buttons on a swatch of burlap. Frame optional!
Welcome! I’m so glad you are here! Sign up here to have your blog posts delivered right to your inbox to stay in touch.
Sponsored by Stearns & Foster
Coastal Cottage Bedroom Makeover
Recently I’ve been sharing some of the design “shuffling” that has been going on around our house! Last week I promised to come back to share the “after” of the summer refresh in our guest room. So, voila! I’m back with this coastal cottage bedroom makeover!
I’m totally in love with the new look. I really didn’t even change a lot, but oh my goodness, I’m always thrilled when a few changes are all you need to feel like you are in a brand new space.
Guest Bedroom Design Details
In this room we focused on finishing up key elements that brought comfort, texture and personality, like a new mattress, adding fun striped curtain panels with pom pom detail and a beautiful new wood beaded chandelier.
I love decorating over time (and being patient with the process) because it eventually allows me to begin to add in pieces I really love.
We weren’t able to get a statement light fixture earlier on, but I knew it was going to be worth waiting for. Some of the fixtures I really wanted were totally out of my budget, so I was willing to be patient for something special that would still be in my price range. Light fixtures can make such a difference, so they are worth careful consideration.
We actually needed a light fixture that was a smaller scale than many of the options out there because, well, it’s a TINY ROOM. I am a big fan of shopping in the kids or teen section of designer furniture stores like Pottery Barn. They often have similar styles and quality to their main fixtures, but they usually offer more affordable pieces and often smaller scaled items for shorter ceiling heights and smaller spaces. (All my sources will be linked at the end of the post).
I feel like I love this room even more because I had to wait for several of the key elements to come together. When you have to wait, you appreciate each detail even more.
A Quality Mattress
The most luxurious thing in this room is our new Stearns & Foster mattress. As I mentioned in my “before” post, my husband and I had a Stearns & Foster mattress for over 15 years. We moved it to five different master bedrooms in that period of time, so clearly we didn’t want to part with that mattress.
Great sleep is an essential part of well-being, so comfort should be a part of a well-designed bedroom. While I love new curtains and light fixtures, sleeping has always been my favorite. I’m happy to finally welcome a brand new Stearns & Foster back into our home (and eventually into our master bedroom, sorry guests!). This beauty changes everything!
It’s hard to even convey how comfortable it is. It’s not like any of the mattresses that are delivered to your door in a box. It isn’t lightweight or flimsy at all. It’s dreamy to sleep on, but so solid and well-built. When you lay on it, you feel like you are being hugged by a cloud, ha! In my opinion it has just the right amount of support to plush ratio :).
Just like putting together a lovely room, this mattress is crafted with such amazing detail. I love that it is a feast for the eye, too! Look at all the gorgeous quilting, tufting and the trim work! I almost hated to cover it up with bedding; it’s such a beautiful mattress. It even has convenient leather straps. No detail was overlooked for style or comfort.
Everyone in our family agrees; this is the best spot in the house.
We’re all ready for summer vacation in here! The only thing I should caution you about if you are considering putting a Stearns & Foster mattress in a guest room is that no one will want to leave.
Everyone seems to just settle in and make themselves at home.